How to Replace a Spa Pump Shaft Seal

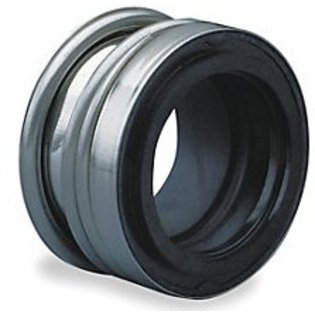
Spa pump motor shaft seals - they are meant to keep the water from leaking along the shaft of the pump motor, behind the impeller. When a shaft seal fails, as they do from time to time, you will notice water dripping along the backside of the volute (where the shaft enters the impeller housing), running down and dripping off the bottom of the pump.
A leaking shaft seal can easily be confused with a failed volute (impeller housing) o-ring, or with a leaking union or plumbing fitting on top of the pump. In fact, many leaks around the pump will end up running down - and dripping off the bottom.
Is Your Shaft Seal Leaking?
To be sure that you have a leaking shaft seal, inspect all areas around the pump closely (with a flash light and reading glasses, if necessary). If you have an open volute (where you can see the motor shaft), a leaking shaft seal will leak where the shaft enters the volute, as shown in the image on the right.
Looking close-up in the area indicated, you will usually see a thin, running stream of water, although in some cases, it could be spraying water in all directions.
Spa pumps with closed volutes (where you can't see the motor shaft), will be leaking out of a drain hole, in the bottom of the seal plate, or the point where the motor joins the "wet end" of the spa pump.
Identifying a Spa Pump Shaft Seal
Not all spa pumps use the same shaft seal, and seals used for hot tub pumps are usually of a higher grade rubber (Viton or Silicone Carbide), than those used in swimming pool pumps. These materials are more resistant to chemical changes, and if you use a spa ozonator, these materials won't deteriorate like a shaft seal made with a Buna type synthetic rubber.
The easiest way to order the correct shaft seal, is to order by make and model of the pump. This may not be so clearly marked on many pumps however. If you still have documentation on the spa purchase, an owner's manual should list the shaft seal, and it's manufacturer's part number.
The next easiest way to find out which shaft seal is used on your pump is to remove the pump from beneath the spa (shut off power and water valves first), and disassemble the motor from the wet end, so that the shaft seal can be measured and identified.
Disassembly of the Wet End
Motors can be removed from a spa without too much work. First make sure that the power is shut off on the main breaker. Place tape over the breaker to prevent others from flipping it back on while you work. Close the valves both sides of the pump to hold back the water in the spa, otherwise, you'll need to drain the spa first before pump removal.
Unscrew the unions on the pipes that come in and out of the pump (there will be some water spillage). Disconnect the bare copper bonding wire from the bonding lug. Remove the power cord from the control box. With the motor removed, and in a location that you can work on it (without stooping or laying on your stomach), loosen the bolts that secure the front plate to the volute.
With the front plate removed, you should be looking at the impeller. Some spa pumps have an impeller shroud, or diverter that will need to be removed first. Remove the impeller by holding the shaft firmly in place, while spinning the impeller in a counter-clockwise direction. For open volutes, a small pair of vice grips can be used to hold the shaft firmly so it won't turn as the impeller is threaded off of the shaft.
For closed volutes, the trick is to hold the shaft in one location at the rear of the motor. For motors with a removal end cover, a 7/16 wrench can be used on the rear of the shaft. Others have a small shaft cap that can be removed, dead center of the rear end bell of the motor. The shaft is slotted to accept a large flat head screwdriver, used to hold the shaft stationary.
After removing the impeller, you should see your shaft seal, and you can now identify it by type and size.
Measuring your Spa Shaft seal
Spa shaft seals come in two pieces, a round ceramic disk, and the other half, with the spring. One piece will be pressed into the seal plate of the pump, and the other half fits onto the impeller. As the two halves of the shaft seal are drawn close together during impeller rotation, the spring is compressed, and a good "seal" is made. The seal doesn't actually touch the shaft, if it did, it would burn up in just seconds of 3400 RPM of the motor shaft. Nonetheless, you will notice that many shaft seals mention the shaft diameter of the motor that they fit.

Remove both pieces of your shaft seal from the pump. The mating ring may require a small flathead screwdriver to pry it out, as it is pressed into place. Be sure to also remove the rubber mating ring, if present.
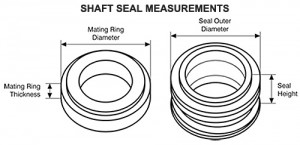
The other half of the seal, with the spring, can be worked off gently with your fingers. Once removed, take the diameter and height measurements, as shown left.

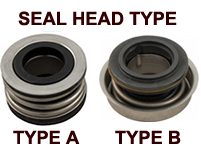
The other distinction between shaft seals is the type of head that the "spring half" of the seal is either Type A, or Type B. Most spa pumps with Type B seal heads will be using a #1000 seal, but check the other measurements of the seal to be sure. Another measurement, if you want to be really sure, is to measure the diameter of the shaft. Calipers would be most accurate, or you can use a rigid measuring tape, and eyeball it very closely.
Spa Pump Shaft Seal Chart
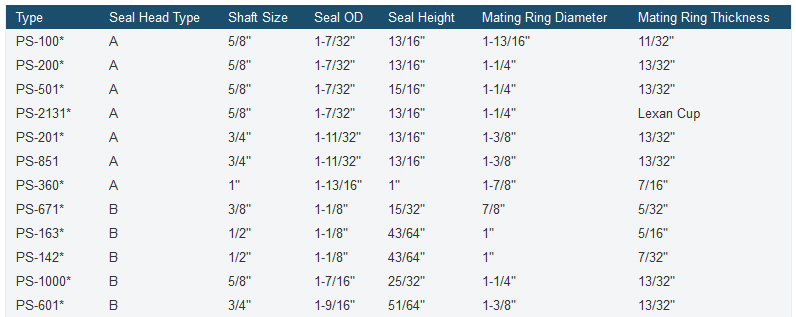
With this information on the shaft seal head type and the diameter measurements, and perhaps the shaft measurement, you can now refer to this handy spa pump shaft seal chart, to confidently figure out the type of replacement shaft seal needed, or the seal number, shown in the left hand column. Most common are the shaft seals #100, 200, 201 and 1000, but your spa pump could use a different one. Measure to be sure, and call us if you have any questions.

NOTE: The Seal Type numbers in the left column, (i.e. PS-100) are commonly accepted universal seal part numbers, which will correspond in size and type, to the manufacturer's part number. Again, if you have any questions or concerns with proper shaft seal identification, call us for help.
Installing a new shaft seal
The biggest mistake people make when installing a new shaft seal is installing the seal or the mating ring upside down. As you remove the two halves of the seal, take note of it's orientation. If this bit of information is not available, take note of how the seal is packed in the box - usually, this is the correct position. Otherwise, know that the ceramic part of the mating ring is meant to contact the hard plastic side of the seal.
When installing Type B seals into the seal plate, use a bit of silicone around the stainless steel cup as you press fit the seal into the plate. Use a very large socket, or a 1" PVC coupling as a setting tool, to lightly tamp the seal cup fully in place.
When installing Type A seals over the impeller, put the soft rubber side toward the impeller, and the hard plastic side toward the ceramic face of the mating ring.
After installing both seal halves, thread the impeller back on fully, and reassemble the wet end (with no leftover parts!). Reposition the pump and connect the unions, making sure the o-rings are in place. Reconnect the bonding wire and the power cord. If your pump was mounted onto a skid, or base, resecure the pump to reduce vibration and movement.
Fill the spa or open the valves to allow the pump to fill with water. Turn on the circuit breaker and test the pump. If water does not begin to flow immediately, you probably have an air lock in the pump or spa pak. Shut off the pump, and loosen the union on top of the pump just slightly, to allow air to be pushed out, until water begins to flow and spill. Quickly tighten up the union and test the pump again.
PREVENTING DAMAGE TO SHAFT SEALS
- Never run the pump dry, or without water flowing through it.
- Maintain your water level in the spa, to prevent air being sucked in.
- Use Viton shaft seals if you use a spa ozonator.
- Maintain proper water balance and sanitizer levels.