Installing a Hot Tub Ozonator
Ozone is a powerful natural sanitizer that requires only annual attention (or less), and can handle the bulk of your water sanitation. And now, new models of Del spa ozonators now have 5 year lifespan on the CD ozone generator.
Installing a spa ozonator is nearly just as easy. Many spas already come with ozone, or are 'ozone ready', with an injection manifold already plumbed in place. Even if your spa has never had an ozonator, installing ozone on a hot tub can be an easy job.
With basic hand tools, and the manufacturer owner's manual or installation instructions, you are ready to install an ozonator in 3 steps.
- Mount the Ozonator Unit inside the Cabinet
- Connecting the Ozone Hose to the Injection Manifold
- Connecting the Ozonator Unit to Power
Mounting the Ozonator

Many hot tub ozone installation manuals will advise to install the ozonator above water level, even though check valves and a 'Hartford Loop' in the Ozone Hose or vinyl tubing will protect the unit from water, described below. For most portable aboveground hot tubs, the ozonator is placed under the cabinet, high up on the wall, in an accessible area with good air circulation. For inground spas or for tubs with equipment sheds, if you can mount the ozonator above the water level easily, by all means do, but it is not a strict requirement.
Use all screws to firmly attach the ozonator unit to the wall or stud, high up on the inside wall. A secondary piece of plywood can be used for added strength, and to prevent drilling through the spa cabinet from the inside. Mount in a location that indicator or status lights can easily be seen and future maintenance or replacement can be easily accomplished.
Connecting the Ozone Hose to the Injection Manifold
Ozone Ready Spas: An ozone ready spa will already have an Ozone Injector plumbed in place, or may utilize an Ozone Jet Fitting to draw the ozone into the spa. Or you may just need to add an Ozone Injector to the pipe already designated for ozone, both described below, but - check your owner's manual for ozone details.
For spas and hot tubs that have not had an ozonator before, and are not 'ozone-ready', there are 3 ways to introduce the ozone gas into the water line.
- Plumb an Ozone Injector into a 3/4" Water Hose: For this method, locate the 3/4" diameter water hose that leads to one of your spa jets. Choose a jet on the 'end of the line', or by itself, and preferably near the bottom of the tub if possible, to give the ozone another second or two to work as it bubbles up to the surface. Coordinate the ozonator installation with a drain & refill of the tub, unless you have a valve or other means to stop water flow while the injector is quickly inserted. Cut the hose with a razor knife or shears, and push the hose over the Ozone Injector and clamp firmly in place. The injection fitting, where the Ozone hose connects, should be facing up, and the indicator arrows should point in the direction of water flow. If there are no arrows, the end that you cannot blow air into, is the exit for the water.
- Attach Ozone Hose to a Spa Jet Air Intake: Most spa jets are combination Air and Water jets, mixing at the jet for increased force. Some spa jets receive air from an Air Manifold, and on other spas using 'Stacked Jets', the air line runs in/out of each jet, and to the next. If you have a single hose and a single air port on your spa jets, cut the hose at the manifold and at the jet, and plug the manifold end. For a stacked jet configuration, remove one jet from the air loop, bypassing that valve, and use adapters and plugs to connect your Ozone Hose.
- Plumb an Ozone Injector Manifold: This method uses a large PVC manifold to connect to your 1.5" or 2" PVC plumbing - after the pump and heater. You will need about 24" of clear space to install the large manifold, or with several 90° fittings, you can create the space. Glue the manifold in place, and you are ready to connect your Ozone hose.
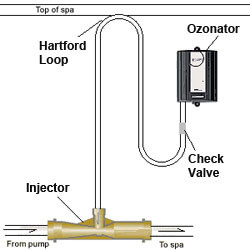
Hartford Loop & Check Valve: In addition to the connection point for the Ozone Hose, you also need to run the hose in a loop above water level, and install a check valve, to prevent water from backing up into the ozonator, which could easily damage or destroy the unit.
A Hartford Loop is simply running the hose above the water level with a 6-8" wide loop, in between the ozonator and the injector. An ozone check valve is then placed in the ozone hose, between the loop and the injector, as redundant protection against water damage.
All Ozone check valves will fail eventually, and should be replaced every 12-18 months, as a preventative measure. Ozone Hose also becomes brittle in a few years, and should also be on a replacement schedule.
Connecting the Ozonator Unit to Power
Most hot tub ozonators are equipped with either a J&J mini plug or AMP plug, to connect directly to your spa controller circuit board, and as such, is controlled by your system to only operate when the pump low speed is operating, instead of running 24 hours per day. If your ozonator comes with an AMP plug, but you have J&J plugs, short ozone adapter cords are used to connect to your spa pack.
For hot tubs without a spa pack controller, or old systems without an ozone connection port, the power wires can be hard-wired directly to the spa pump time clock, to operate only when the pump is operating, preferably only on low speed. You can also connect your ozone hose into the plumbing of a 24 hour circulation pump.
Finally, if your spa has a GFCI outlet powered by the pump or controller, you can power the ozonator directly into the 115V outlet with a regular 3-Prong grounded plug.