How to Replace a Spa Pack
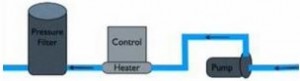
A Spa Pack is an integrated unit that contains the spa pump, heater, blower and controls. On average, a spa pack will last around 10 years, before one or more components begins to fail, or give you regular trouble.
Replacing your Spa Pak can be a quick and simple affair. In the worst case scenario, it may involve some light plumbing and wiring, and replacement of the top-side spa control, if purchased with your spa pack.
Selecting the Right Spa Pack
Digital or Air System?
You probably have a "spa-side control", a small control panel "top-side", that you use to operate the spa from inside the tub. If you have a digital display, you have a digital control. If your spa-side control has a dial for temperature, and air buttons with air hoses running to the control box - this indicates that your spa has an air system control. Since they are close in price, many spa owners may upgrade their new spa pack to a digital system.
Spa Pack or Spa Control?
Spa Packs are the complete kit and kaboodle - control box, heater, pump(s) and sometimes also a blower. Everything, really - with the exception of the spa filter or ozonator. The Spa Control is just the controller for the spa, although some newer controls also include a spa heater.
If your system is fairly new, and you are mainly having problems with the control, with the other equipment in good order, you can save some bucks and replace just the spa control. If the other equipment items are older than 7-8 years, you may want to consider replacing the entire spa pack, to avoid equipment failure in the near future.
Gathering Information
Before you can order a replacement spa pack, grab your reading glasses and a flashlight, and get up close and personal with the existing equipment. You'll need to locate and write down the following bits of information, from the name plates on the control and pump.
- Pumps: One pump or Two? Locate the Horsepower (HP) on the motor nameplate.
- Heater size: Usually, residential spas are either 1.5kw or 5.5kw
- Control Voltage: Incoming voltage is either 120 volts or 240 volts (or 115/230).
- Blower - do you wish to replace the blower also?
- Pipe Size: 1.5" or 2"? 1.5" PVC pipe has an outside diameter of 1-7/8".
- Inlet Direction: Is Control inlet on the left side or right side of the pump?
Installing your New Spa Pack
1. Shut off the Power, at the main Circuit Breaker for the spa. Read the installation instructions.
2. Close the isolation valves to shut off water before and after the pump, or drain the spa.
3. Loosen the unions before and after the existing spa pack, and remove wire connections from the spa light, ozonator, stereo or other accessory equipment.
Your spa pack control and heater must be installed after the pump and before the filter (unless your spa filter cartridge is located in the skimmer well of the spa). Make sure that the pipes are connected to the correct in and out ports of the pump and the heater.
Line up your new spa pack, and determine the plumbing arrangement. In most cases, all of the plumbing fittings and pipe you will need are included, but in some situations, a trip to Home Depot may be in order to pick up a few fittings, or a fresh can of PVC glue and a can of primer or PVC pipe cleaner.
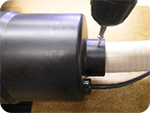
Dry fit all of your plumbing together before gluing, to make sure that everything is lined up, and all pipes and fittings can be glued to their full depth. NOTE: A spa air blower is not glued onto the pipe. Fumes from PVC glue can be ignited by a blower, so instead, use a screw or clamp to secure an air blower onto PVC pipe, as shown right.
4. Position spa pack components and secure them to the base or skid.
5. Clean and glue the PVC joints. Use Teflon tape on threaded fittings.
6. Attach wire plugs from spa light or other accessory equipment into the labeled ports on the control box.
Making the electrical connections is fairly straight forward, and safe - as long as the power is off. Tape the breaker in the "Off" position, to prevent someone from accidentally turning it back on.
Make the hard wire connections from the new spa pack to the wires from the main circuit breaker (which is still Off!). If you doubt your abilities, please contact a certified electrician to make these connections.
7. Fill the spa, and inspect for any leaks in the pipes or equipment (before it gets too full).
8. Install the new Spa-Side control, by mounting in place of the existing top-side controls. If your new control is much smaller than the old one, you can use a small saw or Dremel tool to cut small openings in the current control, and mount the new control right on top of the old control.
9. Turn on power to spa, and set the thermostat to the lowest setting.
10. Run the spa jet pump on high for several minutes to purge all air from system before turning up the thermostat and testing the heater.
And, you're done! While the spa is heating up, take some time to read the owner's manual operating instructions, and send in the warranty registration card.
JUMP IN WITH US ON SOCIAL!